TheoWorlds Builder SDK v2 Documentation |
Where to start?
1. Running TheoChat v2 on your own server (using SmartFox Server)
You downloaded all the files and now you want to run the demo applications on your server.
You can run Theo Map Editor locally or just copy on your server - you don't need to install anything extra for that.
TheoChat needs SmartFox Server (purchased separately) to run (or the Electroserver alternative, read below). In order to run TheoChat on your local computer or server, you have to:
- Download and install SmartFox Server (http://www.smartfoxserver.com/products/pro.php#downloads). You don't need the Pro version. For testing use their free version (supports up to 20 users).
- Locate the SmartFox Server configuration file, called config.xml. By default it will be located in:
C:\Program Files\SmartFoxServerPRO_1.6.2\Server\config.xml - Locate the tag <Zone name="TheoChat">. If you can't locate this tag - create it.
- Replace this tag and all its content with the one from config.xml files that is located in /socket_server/Smartfox. Or you can just replace the whole content of config.xml with the content from config.xml file.
- Locate TWB config file config.xml (this is a different file from the SmartFox Server's config.xml). It is located in the main TWB folder, the same location where config_server.xml is located. Locate these lines:
<SocketServer>SF</SocketServer>
.....
<!-- SmartFox settings -->
<ip>127.0.0.1</ip>
<port>9875</port>
By default TheoAvatar assumes that SmartFoxServer is running on your local computer (IP: 127.0.0.1), on port 9575. You can also point it to a SmartFox Server that runs on another server.
 Make sure you check the port on which SmartFox Server runs, and edit it if needed in the TWB's config.xml.
 - Now you can run TheoChat from your browser or from IDE.
2. Running TheoChat v2 on your own server (using Electroserver)
You downloaded all the files and now you want to run the demo applications on your server.
You can run Theo Map Editor locally or just copy on your server - you don't need to install anything extra for that.
TheoChat needs Electroserver (purchased separately) to run (or the SmartFox Server alternative, read above). In order to run TheoChat on your local computer or server, you have to:
1. Install and configure ElectoServer:
- Download and install ElectoServer (http://www.electro-server.com/downloads.aspx). You don't need the Enterprise version. For testing use their free version (supports up to 25 users).
- Locate TWB config file config.xml in the main folder.Locate these lines:
<SocketServer>ES</SocketServer>
.....
<!-- ElectroServer settings (Theo) -->
<ip>127.0.0.1</ip>
<port>9898</port>
By default TheoAvatar assumes that Electroserver is running on your local computer (IP: 127.0.0.1), on port 9898. You can also point it to a Electroserver that runs on another server.
- After the installation, copy the TWB folder called “moderatorplugin” (located inside the folder "socket_servers/Electroserver/") into the ES extension folder (ex: C:\Program Files\ElectroServer_4_0_6\server\extensions\), so you will get something like C:\Program Files\ElectroServer_4_0_6\server\extensions\ moderatorplugin.
- Run the Electroserver Web Administrator ( "Start"->Programs->Electroserver 4.0.6 -> Electroserver Web Administrator).
2. Configuring the rooms:
- In the administrator panel, go to "Persistent Rooms"
- Click Create a new Persistent Room (on the left)
- Enter Zone Name: TheoChat, Room Name: Lobby. Save.
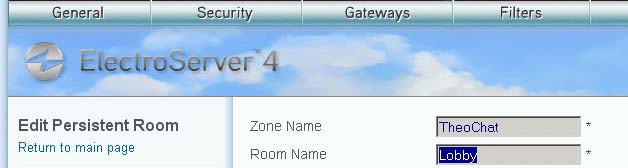
- Do the same for the other rooms: Apartment, Levee, Dance Club, Park (same Zone Name: TheoChat).
- Click "New Room Variable"
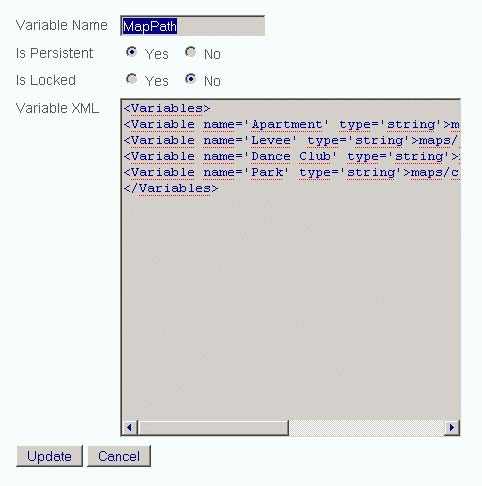
- Name the variable "MapPath", put "Is Persistent": Yes, and paste this XML into Variable XML:
<Variables>
<Variable name='Apartment' type='string'>maps/chat_apartment.xml</Variable>
<Variable name='Levee' type='string'>maps/chat_levee.xml</Variable>
<Variable name='Dance Club' type='string'>maps/chat_dance_club.xml</Variable>
<Variable name='Park' type='string'>maps/chat_park.xml</Variable>
</Variables>
Here is how it looks:
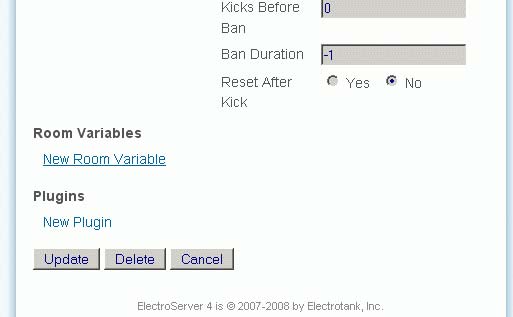
IMPORTANT: "Lobby" is a mandatory room - it is used for login.- Add room-level plugin to the "Lobby" room:
- Open the room editing window (like in step 6, when adding the MapPath)
- On the bottom of that window, click "New plugin":
- In the window that opens add the parameters like on this image:
- Click "Update".
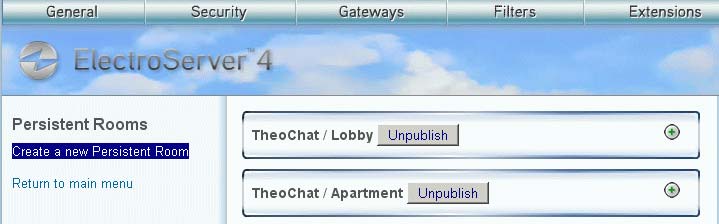
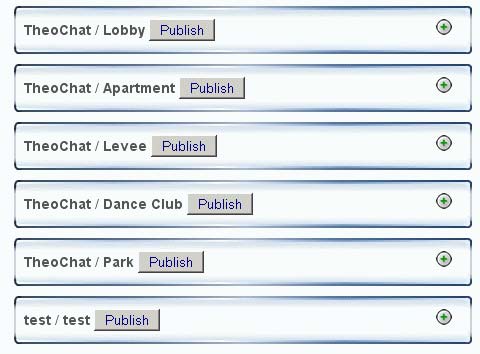
- After you configure the rooms, click again "Persistent Rooms". For all the rooms (especially Lobby) click "Publish".
3. Configuring the extension:
In order to support/detect the moderator feature we wrote a small server extension for Electroserver. This is just a simple demo extension - you should write your own using this example (check Electroserver documentation on server extensions).
In the Electroserver Web Administrator - extensions -> select Create New Server-level Component
a - Extension Name - select "moderatorplugin"
b - plugin name - "moderatorplugin"
c - plugin handle - select "moderatorplugin"
Here is how it looks:
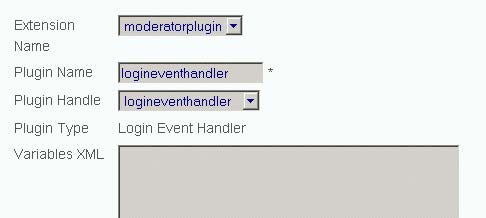
repeat with these settings:
a - Extension Name - "moderatorplugin"
b - plugin name - "logineventhandler"
c - plugin handle - "logineventhandler"repeat with these settings:
a- Extension Name - "moderatorplugin"
b - plugin name - "logouteventhandler"
c - plugin handle - "logouteventhandler"4. Configuring the moderator access
Now you can run TheoChat from your browser or from IDE!
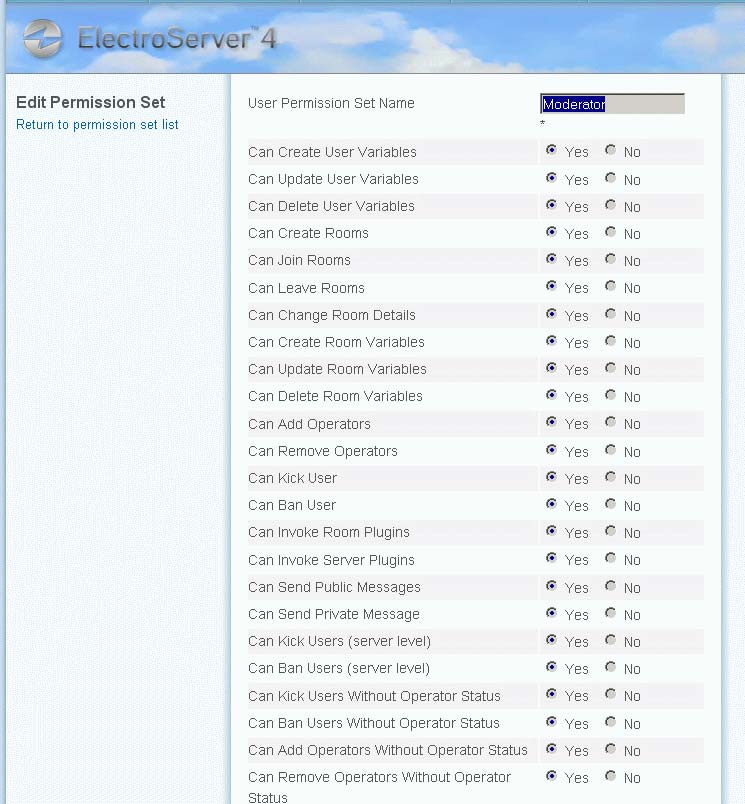
- In the Security -> Manage Permission Sets -> Create a new permission set -> User Permission Set Name type in “Moderator” and then select all the radio buttons - "Yes":
- Restart the Electroserver and you are good to go!
3. Your first TheoWorlds application
Here we will show you how to build a very basic application using TheoWorlds Builder. With just little code you can have a small virtual world built in minutes.
In the main folder of your SDK locate the SimpleApplication.fla and open it. If you open SimpleApplication.html, you will see the app in action:
click on the image to launch the application
As you see, it's a simple small map, covered with ground tiles, with a chair on it and a character. You can click on the map to walk the character around, you can click on the chair to sit on it, and there is also a "dance" button to trigger the character's dance animation.
Now let's see how it's all done - check the first frame of the "actions" layer in SimpleApplication.fla - all the code is located there:
1. stop();
2.
3. import flash.geom.Point;
4. import com.theoworlds.utils.Utils;
5. import com.theoworlds.builder.*;
6. import com.theoworlds.builder.settings.*;
7. import com.theoworlds.builder.lib.*;
8.
9. // getting the link to the Library (a Singleton)
10. var library:Library = Library.getInstance();
11. var world:World;
12. var c:Character;
13.
14. var parsingComplete = function(){
15. var aFloor:Array = Utils.createSimpleMap(10, 10, {libID:100, libItemID:1});
16. // creating the world
17. world = new World(_root, 10, 10, Constants.TILE_HEIGHT, Constants.TILE_HEIGHT*2,
18. null, null,
19. aFloor, null, null,
20. new Point(20, 160),
21. 10, 10, 80);
22. // connecting the world logic ("game rules")
23. world.worldLogic = new WorldLogic(world);
24. // usually, in a complex application, worldLogic gets the events from the GUI
25. // since this simple app does not have a GUI, worldLogin listens directly to the mouse events
26. Mouse.addListener(world.worldLogic);
27.
28. // adding a chair to the map
29. var fs:FurnitureSettings = new FurnitureSettings();
30. fs.libID = 100;
31. fs.libItemID = 2;
32. world.addFurniture(5, 6, fs);
33.
34. // adding a character
35. var cs:CharacterSettings = new CharacterSettings();
36. cs.libID = 100;
37. cs.libItemID = 3;
38. cs.brainType = "controlled";
39.
40. c = world.addCharacter(2, 2, cs);
41. // setting the character as the main one
42. world.iCharacter = c;
43. }
44.
45. library.addListener(this);
46. library.addLibrary("library/simple_application.xml");
47.
48. // --------------------------------------------
49.
50. btnDance.onRelease = function(){
51. c.doAction("dance");
52. }
Let's see how this code works:
Line 1-7 - loading the main classes
Line 10 - creating an instance of a Library object. Just one Library object is allowed. This object will store the information and references to all the graphics used on the maps - floor tiles, furniture and characters.
Line 11-12 - declaring the variables that will store the the World - the main object needed to handle the virtual worlds, and a Character object.
Line 45-46 - loading the library XML file and add a listener to the library object, that will call the parsingComplete() function once the loading is over. Here is the library/simple_application.xml content:
<?xml version="1.0"?>
<!--http://www.TheoWorlds.com--><library id="100">
<items>
<i id="1" url="library/floor/g001.swf"/>
<i id="2" url="library/furniture/i012.swf" elevation="22" selectable="1">
<actions>
<a name="sit"/>
</actions>
</i>
<i id="3" url="library/characters/man_forSimple.swf" speed="180">
<actions>
<a name="sit" snapToAction="1" allowedActionDirs="4,6"/>
<a name="default_walk" frames="5" nonStop="1" movable="1"/>
<a name="dance" frames="8" nonStop="1" allowedActionDirs="5"/>
</actions>
</i>
</items>
</library>This is a very small library, that contains references to one floor tile (image stored in library/floor/g001.swf), one furniture (the chair - image library/furniture/i012.swf), and a character (image library/characters/man_forSimple.swf) that has three different actions/animations: walking, sitting and dancing. All this info is loaded into the library object. Check more about libraries and map graphics in the corresponding sections.
Once the XML is loaded, the parsingComplete() function is called:
Line 15 - creating an array with map floor objects. A function from Utils class is used to generate an array of ground tiles (instead of adding them one by one later) - this array will be passed to the World object when it will be initialized. The floor tile is referenced by library ID and element ID from the XML:
...
<library id="100">
<items>
<i id="1" url="library/floor/g001.swf"/>
...Line 17-21 - creating the world object - the main object of the virtual world. Note that aFloor array is passed as one of the parameters. A bunch of other parameters are passed (check the world object for more details), including the map size (10 rows x 10 columns).
Line 23-26 -creating the worldLogic object (inside the world object) - this class is responsible for the "world behavior" - how it reacts to different events. This is where the game logic would be stored if it would be an online game. Also, we assign a listener to it, to track the mouse events (clicks on the map). In a real application we would have a separate GUI class that will listen to the mouse and will generate the events.
Line 29-32 - adding the chair to the map.
Line 35-40 - adding the character to the map. This line: cs.brainType = "controlled"; assigns the behavior class to the character, that defines the way the character acts. The "controlled" one is for characters that are controlled by mouse events.
Line 42 - defining this character as the main one (the "I" character, since there could be other users characters on the map (or bots)).
Line 50-51 - There is a button on the map, that triggers the character "dance" action. Read more about characters actions here.
This is all the code you need to generate this simple world. Here are all the files you need to have it running:
As you can see, besides the main SWF, you need the library XML file (library/simple_application.xml) that contains the list of all the objects that can be used in the world (in real applications you will have multiple XML libraries, with separated ones for floor tiles, furniture and characters). The main map objects parameters in the library XML are the links to the actual images of those objects - usually stored in external SWF files (library/characters/man_forSimple.swf, library/furniture/i012.swf, library/floor/g001.swf).
A complex TheoWorlds application will contain more classes and the main code will not be added to the timeline. For a complex TheoWorld application check TheoChat v2 example (commented source files are included in the SDK).